Posts

So, you have a PDF that you’d like to put on either the Alumni, Give or DAR site(s), but you’re not sure if the aforementioned PDF meets the criteria for digital accessibility as laid out in the Americans with Disabilities Act Title II digital accessibility (“Final Rule”). 

Well, fear not! Before you send the PDF to DARCOMM to include on the website (or upload it to the site yourself), take these steps to ensure it is readable and accessible for those with disabilities. 

The very first step is to make sure you have Adobe Acrobat downloaded on your computer before beginning. Note: panels and icons may appear in different areas of the program if using an older Acrobat version. 

All DAR employees have access to Adobe Acrobat. If you need assistance downloading it to your device, please submit a support ticket with AIT. 

Basic Setup Information in Adobe Acrobat 

  1. Open Acrobat and click the See all tools feature 
  2. Search accessibility and open the Prepare for accessibility tool 
  3. Select and open the file you would like to check for accessibility 
  4. On the left-hand side under All tools>Prepare for accessibility, click Check for accessibility, then Start Checking 
  5. The accessibility report will show up on the right-hand side of the screen, and you can start fixing the errors 
    • Red (X) indicates something is wrong and needs to be corrected 
    • Blue (?) indicates there is a potential error and needs to be corrected manually 
    • Passed indicates the item is already correct and accessible; you can skip the steps for any categories below that already say passed 

Red (X) Items in the Accessibility Checker 

  1. Click the item with the Red (X) 
  2. Click the 3 dots next to the Accessibility Checker title 
  3. Click Fix 
    • The item may be passed and nothing else needs to be done 
    • A popup box may come up that needs attention. Many are self-explanatory such as confirming the Primary language as English 
    • If the popup box is more complicated, refer to the below categories 
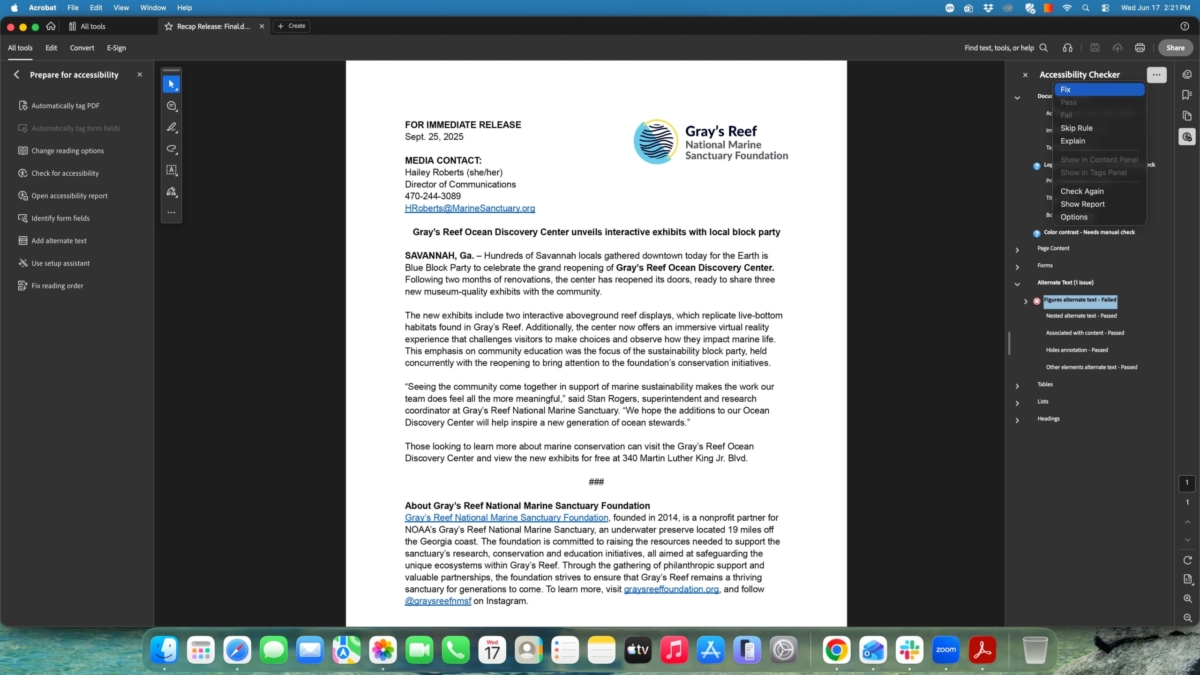
A screenshot of the location of the Fix button in the top right on the program Adobe Acrobat.

The Fix button is located within the Accessibility Checker on the top right of the screen.

Alternative Text with Red (X) 

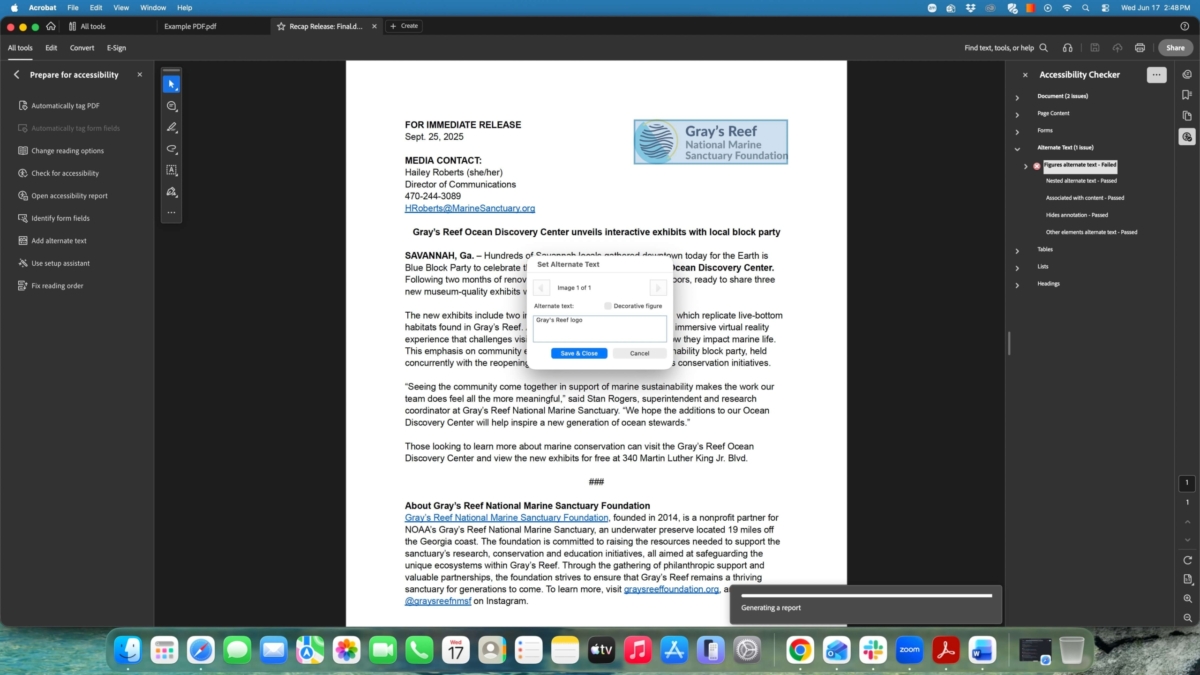
  1. After clicking Fix, a box will appear that asks you to describe the image
  2. Describe the image to the best of your ability (complete for all images in the PDF)
    • For logos, put [brand name]’s logo. Ex: UGA logo or UGA Development and Alumni Relations logo.  
    • For images or illustrations, describe them. Ex: An otter floating on its back 
    • For purely decorative items that do not add anything to the context of the piece, click the box labeled Decorative figure. Ex: A swirl design or a floral element that makes the piece look aesthetic but would be excessive for a person with limited vision to hear described.
  1. Click Save & Close
Screenshot shows to type a description of the logo in the Alternate text box in the middle of the program.

The description of Gray’s Reef logo in the Set Alternate Text box
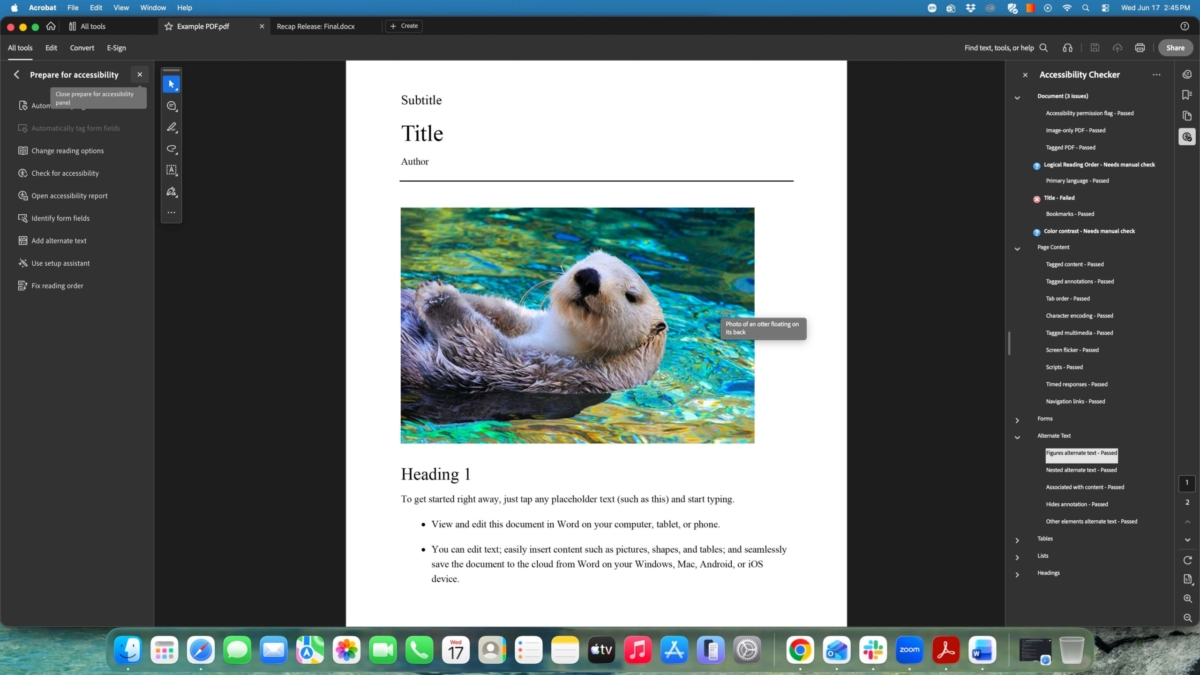
Screenshot shows mouse hovering over an image of an otter to display the alternate text.

The alternate text for the otter image can be seen by hovering over it.

Title with Red (X) 

  1. After clicking Fix, a box will appear asking for a description of the title 
  2. Type whatever you want to title the document 
  3. Ensure Leave As Is under the title box is unchecked 
  4. Click OK 

Color Contrast with Blue (?) 

  1. Go through the PDF and make sure that none of the text is too faint and that the colors of the text are easily read 
  2. If something seems too faint or has hard to detect colors, change the font itself or the font color to something like solid black or navy, so that it is accessible to readers 
    • This is more subjective but ensures people with limited vision or color blindness do not struggle to detect the content of the piece 
    • There may not be anything to change if everything seems easily detected already
  1. Once completed, select the 3 dots next to the Accessibility Checker and click Pass 

Screenshot shows three lines of legible text and one line of text that is too faint to detect.

The 1st two lines and the last line of text appear legible but the 3rd line is too faint for some readers to pick up.

Logical Reading Order with Blue (?) 

  1. Click the item labeled Logical Reading Order 
  2. Click Fix reading order in the left-hand panel or click the Z-shape icon in the far-right column 
  3. Click Show Order Panel 
  4. Go through each numbered item and make sure it is the order you want the piece to be read or processed in (do this for all pages of the PDF) 
    • If there is only one item in the list or the PDF is not divided according to headings, text, images, etc. refer to the below category on scanned PDFs
  1. Click on any item you want to be moved up or down the reading order and drag it to the new place on the list 
    • Mark any images/items that are decorative or do not add to the context of the piece as Background/Artifact in the Reading Order panel 
    • Mark any numbered items that are blank spaces and do not contain content as Background/Artifact in the Reading Order panel 
  1. Once the order is correct, you can close the Reading Order popup panel, and click the accessible person icon in the far-right column or click Open accessibility report in the left-hand panel 
  2. With Logical Reading Order selected, click the 3 dots next to the Accessibility Checker title and click Pass 
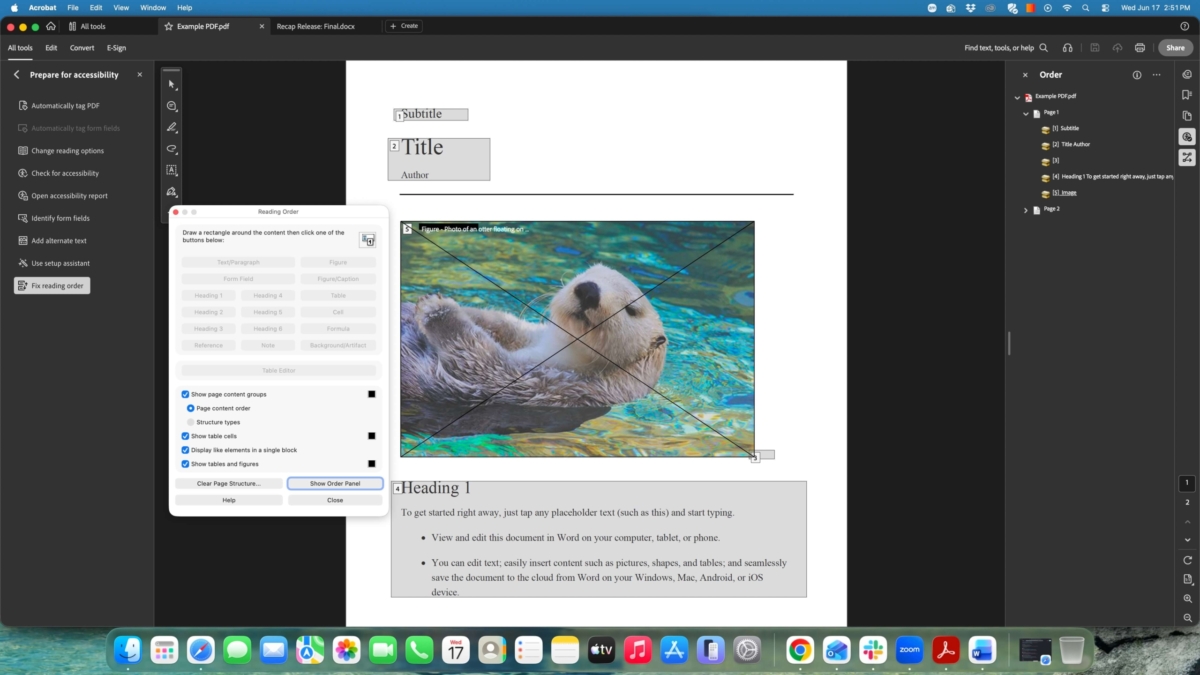
Screenshot shows where to find the Show Order Panel button within the Reading Order popup on the program.

The Show Order Panel button can be found within the bottom right of the Reading Order popup.
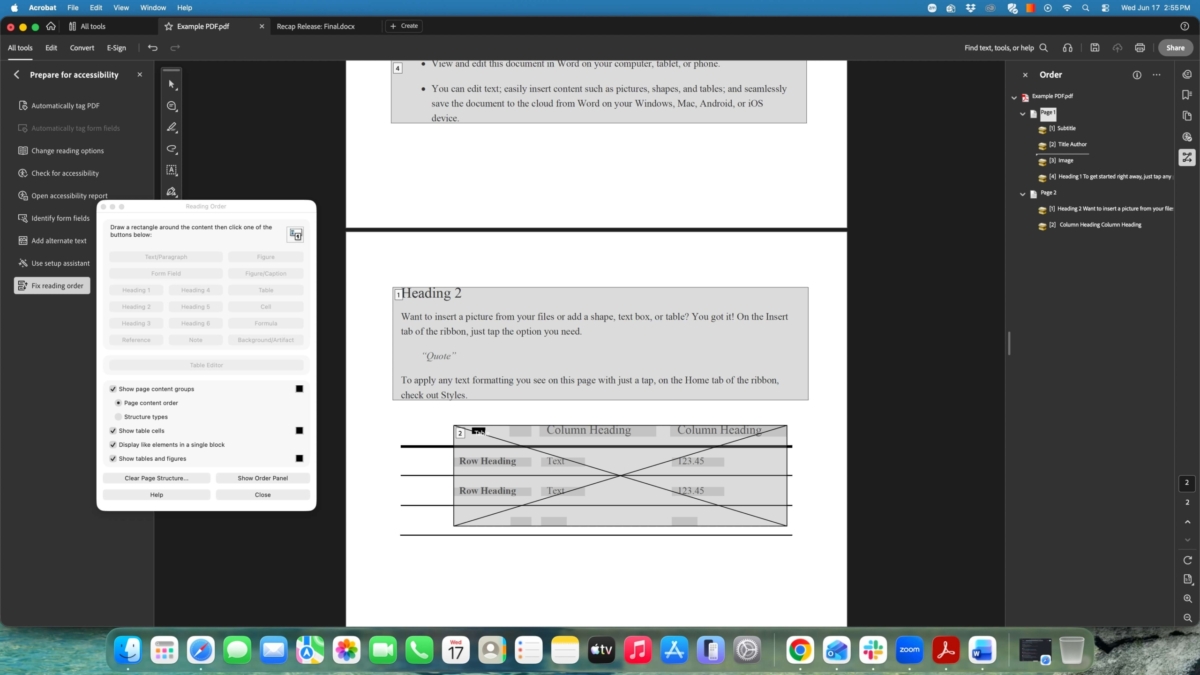
Screenshot shows that items on a PDF can be found in numbered order in the right-side panel of the program.

On page two of the example PDF, the numbered items can be found in the right-side panel and be adjusted according to the order they should be read in.

Scanned PDFs or ImageOnly PDF 

  1. Click the item labeled Image-only PDF 
  2. Click the 3 dots next to the Accessibility Checker title and click Fix 
  3. In the popup box, change the output to Editable Text and Images 
  4. Click OK 

Logical Reading Order for Image Only PDFs 

  1. Ensure the steps in the previous category have first been completed 
  2. Click Fix reading order in the left-hand panel or click the Z-shape icon in the far-right column 
  3. Click the 3 dots next to the Order title  
  4. Click Show page content groups then Structure types 
  5. Manually go through and categorize each element of the piece by holding and dragging the mouse over the individual element on the page 
    • Start with the first heading and after dragging the mouse over it, click Heading 1 in the Reading Order panel 
  1. Continue to go through each element on the page and label it accordingly 
    • Ex: Figure for an Image, Text/Paragraph for body text, Background/artifact for irrelevant additions, and so forth 
  1. After labeling everything, ensure it is in the correct reading order 
  2. Complete steps 6-7 under the Logical Reading Order with Blue (?) category above 
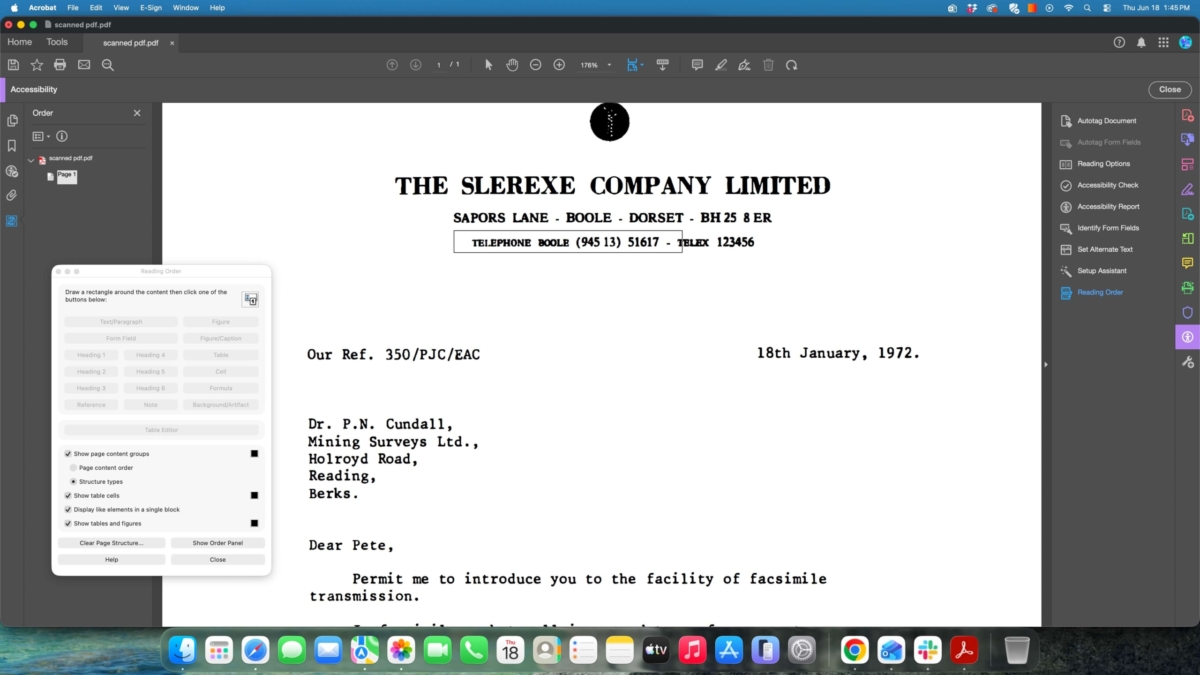
The screenshot shows a mouse cursor being dragged over a line of text in order to properly categorize the content type.

In the example scanned PDF, the cursor is being dragged over the 3rd line of text, so it can be categorized.
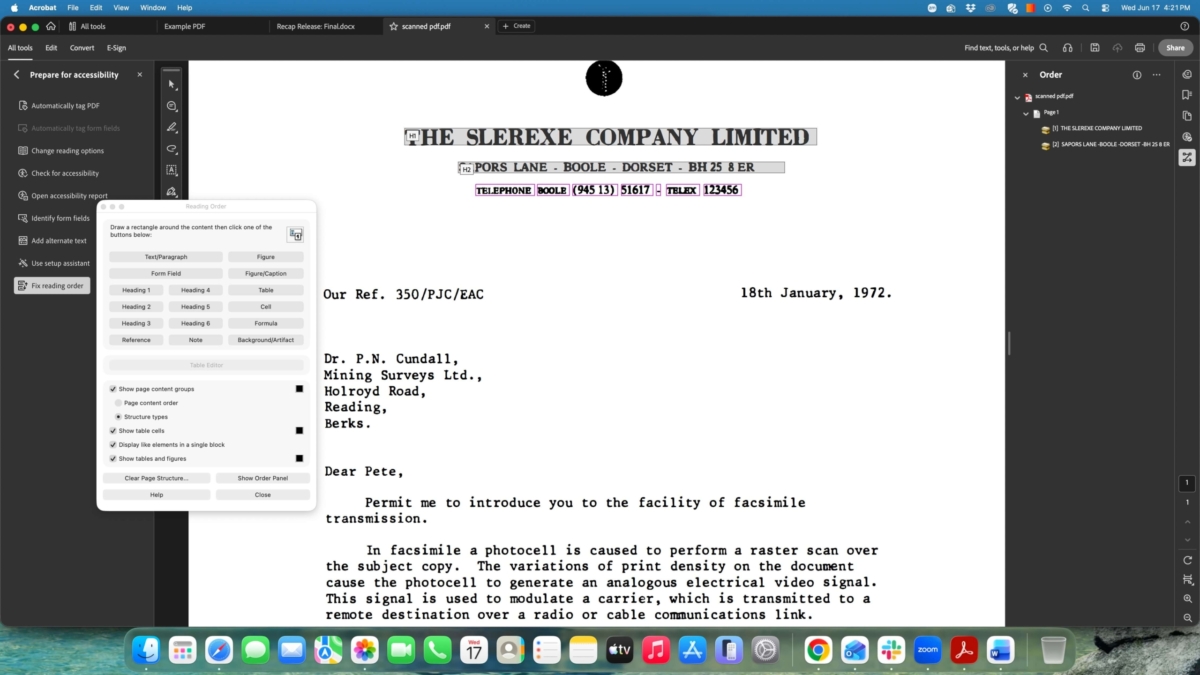
The screenshot shows the content options available to categorize the selected text in the program.

After dragging the cursor over the 3rd line of text, one of the content buttons can now be selected to categorize the text.

Want to learn more about digital accessibility? Check out the Accessibility for Content Creators course in PEP!


, ,
Rachael Andrews headshot
by Rachael Andrews

So, you want to highlight students in your marketing materials to show the impact of giving to UGA?  

That process looks a little different now, but fear not! DARCOMM is on the case.  

The U.S. Department of Education has released new guidelines on the implementation of the Family Educational Rights and Privacy Act (FERPA) to better protect students’ information in an ever-changing digital and technological landscape.  

As provided in a recent meeting for campus PR specialists and brand communicators, representatives from the UGA Office of the Registrar and UGA Legal Affairs shared this new guidance and how it may pertain to communications that originate at the university.  

From the U.S. Department of Education 

A school may disclose “directory information” to third parties without consent if it has given public notice of the types of information which it has designated as “directory information,” the parent’s or eligible student’s right to restrict the disclosure of such information, and the period of time within which a parent or eligible student has to notify the school in writing that he or she does not want any or all of those types of information designated as “directory information.” 34 CFR § 99.3 and 34 CFR § 99.37.

To spare you all from some incredibly riveting legalese, the gist is: if you are using any of the following student directory information in marketing/communication materials, you MUST have that student sign a consent form that follows the new FERPA guidance: 

  • Student’s name 
  • Hometown 
  • Institution-based email address. Under this category, an institution assigned email may be disclosed without consent only to other, current students. In addition, students may not request email listings of the entire student body or segments thereof, except for academic purposes. 
  • Major field of study 
  • Enrollment status (full-time, part-time) 
  • Participation in officially recognized activities and sports 
  • Dates of attendance 
  • Degrees, honors, and awards received 
  • Thesis/Dissertation title 
  • The most recent educational institution attended 
  • Height and weight of athletes 
  • Class level 

Right now, you may be thinking, “Well, what changed? Everything was fine before!” And it totally was. Kind of. Open records requests were making student phone numbers and emails available to the public to solicit students and their parents. This protects that information and their privacy. 

You may have even more questions than you did before you started reading this incredibly well-written blog. We did, too! Here’s what we learned:  

  • This does not apply if you take a photo at an event (like Dawg Day of Giving, for example) and a student just happens to be in the photo — it’s only when any of the identifiable information above is included with a photo! 
  • If you already use some sort of consent form for your work with students, please make sure that it includes FERPA language and that it requires a signature from the student — digital or otherwise. 
  • A checked box on a consent form is not sufficient for the new FERPA guidance — there must be a signature from the student! Digital signatures are acceptable if you decide to convert the consent form to a digital format. 
  • If you have any questions about a consent form you are currently using, it’s always a good idea to double-check with Legal Affairs. 
  • If you are looking to highlight students who receive a scholarship — and you would like them to talk about the impact of that scholarship on their academic journeys, for example — Caitlin Lacey in the Office of Donor Relations & Stewardship has a tried-and-true process for obtaining consent and contacting those students. Work with her first! 

If you have not been using a consent form for your work with students, and that work is primarily marketing-based, DARCOMM has developed a FERPA-compliant likeness release form that you are free to use. 

More information about FERPA can be found at the Office of the Registrar’s website. 

,
Ryan Phillips headshot
by Ryan Phillips

Do you need to provide your dean with an annual giving update in your next meeting? Do you need to know how a specific appeal performed? Do you want to know how your year-to-date performance compares with past years? Do you want to dig a little more into who your donors are?

Well, then do I have some tools for you!

1. Annual Giving Analytics Tool

To access in GAIL: Analysis > Annual Giving under “Analytic Tools”

The Annual Giving Analytics Tool will show your unit’s year-to-date revenue and gift comparisons for the past three fiscal years. You can view this information in a table or a handy graph to see trends over time. The Revenue Details tab helps you drill down into who your donors are—it is even clickable so you can go right to a constituent’s profile if you want to learn more about them and their giving history.

2. Gift Report by Site

To access in GAIL: Analysis > Revenue Reports under “Reports” > Gift Report by Site under “Custom Reports”

This report easily shows you your gifts, donors, fund designations and corresponding marketing efforts. I like to download this data and sort by marketing effort to get a quick overview of how specific efforts performed. Be sure to select “Yes” under the Annual Fund dropdown at the top of the page to only display gifts that count in your annual giving totals.

3. Annual Giving Contribution Details

To access in GAIL: Analysis > Revenue Reports under “Reports” > Annual Giving Contribution Details under “Custom Reports”

The Annual Giving Contribution Details Report shows annual gift or donor summaries by channel in various ways, including by appeal. I use this report to see how gifts are coming in and to gain a big picture perspective about a unit’s donors.

4. Email Statistics

To access in GAIL: Marketing and Communications > Email Statistics under “Custom Reports”

Use this to find out how your email performed. You can see how many people opened your message, who opted out and your link clicks. You can also see email-generated donations and event registrations.

5. Direct Marketing Efforts

To access in GAIL: Marketing and Communications > Marketing Effort Search (Custom) or Direct Marketing Efforts under “Marketing Efforts” 

First and foremost, be sure to activate your marketing effort prior to sending your email or direct mail! This ensures that gifts will be associated with the effort and that recipients will be tagged as having received your communication.

Navigate through the tabs in your marketing effort to view various performance statistics. I tend to focus on these three tabs: Summary, Segments and Revenue. The Revenue tab may be particularly insightful—you can sort from largest to smallest gift amount and perhaps identify future LAG or major gift prospects. The Revenue Pivot Table tab is also informative and fun to play around with.

NEW:  The Revenue Analytics tab was added to marketing efforts in FY23. Was your effort successful with Young Alumni, LYBUNTS, LAG donors, parents, etc.? What was the most popular designation? Should I repeat a similar effort next year? This tool can help you answer all of these questions and more!

6. Annual Giving Dashboard

To access in GAIL: Analysis > Annual giving dashboard under “Analytic tools” > type in your GAIL credentials > filter by site and explore!

Your Dashboard shows a quick snapshot of your program’s performance YoY. By using this tool, you can see YTD gift, revenue, and donor summaries broken down by donor type (renewed, reactivated, or acquired). You’ll also see a summary of your unit’s leadership annual giving numbers, retention rate, and top solicitations. The donor detail tab is filterable, sortable, and clickable, allowing you to really get in the weeds if you have time!


These are just a few of the tools available for you to assess your program’s annual giving health. As always, contact anyone on the central Annual Giving team or submit an AskIT ticket if you have questions!

,
Caitlyn Richtman author photo
by Caitlyn Richtman

The UGA Alumni Association has a social presence on Facebook, Twitter, and Instagram that we post on daily. This will come to no surprise to anyone who has ever worked in social media, but it can be really hard to keep all your posts in order when you are making multiple posts a day across different platforms.

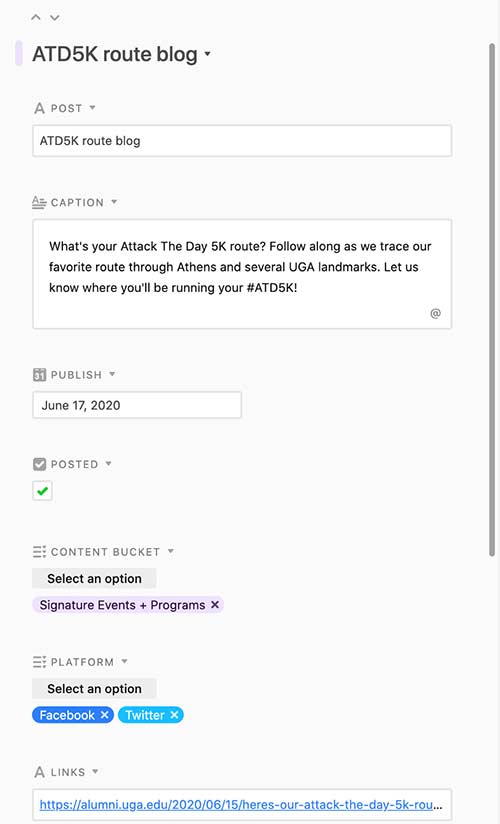
To keep up with our social media posting schedule, DARCOMM uses Airtable, a spreadsheet-database hybrid, with the features of a database but applied to a spreadsheet. Basically, it is a very fancy spreadsheet that you can use for a variety of organizational needs. DARCOMM specifically uses it for social media planning. Here are 4 reasons we have a social media calendar:

  1. Planning Ahead

To say it would be stressful to be a social media manager without a social calendar would be an understatement. It would not be very fun to show up to work every day and wonder what I am going to post. That’s why we use Airtable to plan our calendar ahead of time. Every month I am looking ahead to the next month and organizing our calendar, that way we don’t get to a new month and have a blank page.

Although our social calendar is not set in stone and I sometimes have to change things around last minute if something important pops up, we rely heavily on our social media calendar. DARCOMM is planning strategically about what we’re posting, when we’re posting it, and where on social media we’re posting.

  1. Collaboration

Airtable makes it really easy for DARCOMM to collaborate on our social media calendar. For example, if a unit asks one of the communication coordinators for a post on Instagram, they can login and add all the information I’ll need to make the post.

  1. Keeping Our Priorities Top of Mind 

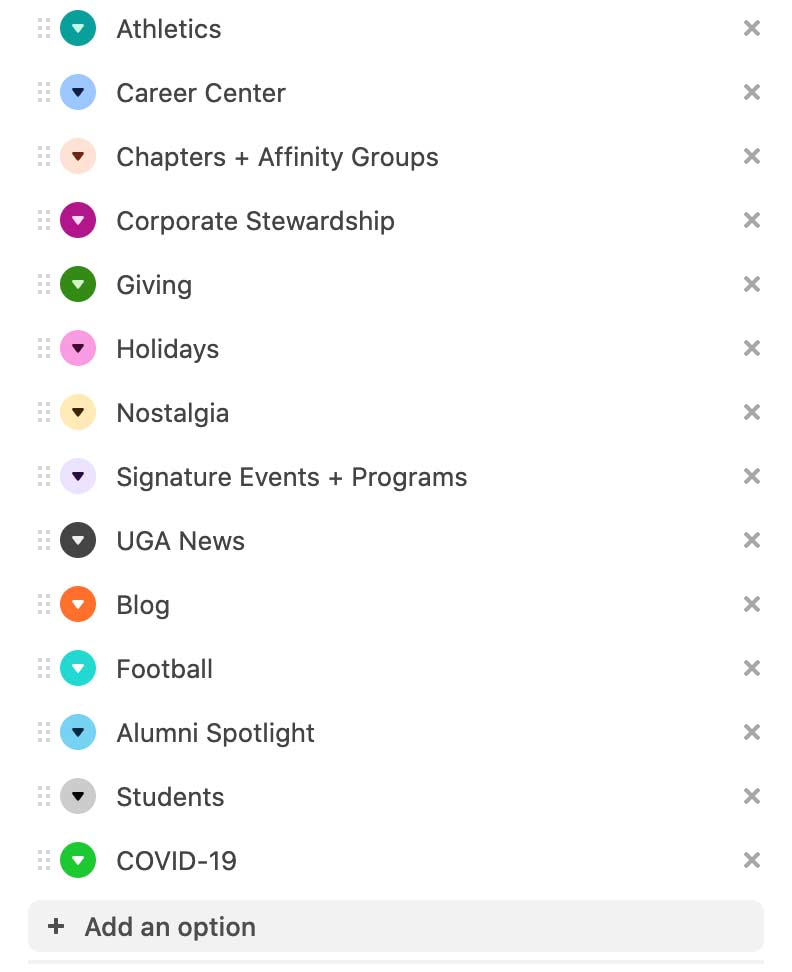
DAR is a large division with a lot of different priorities and goals, a lot of which we support on social media. Our social calendar is color-coded with different priorities labeled with a different color, that way when our calendar has a lot of color variety in it, I know we are highlighting all of our marketing priorities.

For example, if we are lacking light orange in our calendar view, I know to schedule in posts about our alumni chapters and affinity groups.

  1. Thinking About Our Channels as Connected

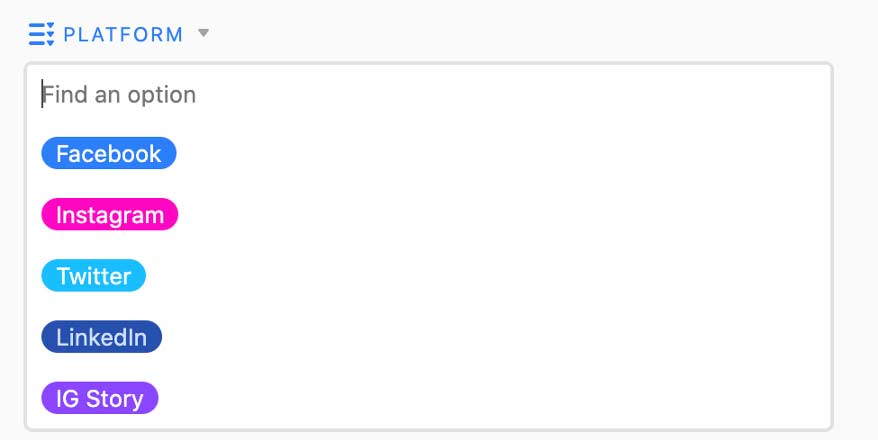
Another great feature of Airtable is that it lets us label exactly what platform we are going to make a post on. This reminds us to think about our different channels as connected and complimentary to each other, but also helps us recognize that not all posts need to be shared everywhere. It helps us be strategic about where our posts go and how we can increase our engagement and reach by making posts that suit the platform they’re shared on.

,